
The continuing education training providers we work with at Arlo before implementing our training management software were typically juggling learner registrations, payments, course scheduling, communications and the management of learners records across multiple delivery formats and audiences.
The problem many face is that they are reliant on multiple systems to manage these processes or still using manual means to manage them e.g. recording registrations on spreadsheets, having an admin respond to emails and manually uploading each course to their website.
Take Arlo customer cLearn, their CEO Jeff Makey before implementing a training management system was spending up to 30 hours a week, managing administrative training processes and tasks .
“I was doing everything by hand – managing registrations, sending out Zoom links, following up with certificates. It was exhausting and unsustainable.” Jeff told us in a recent case study, which tells the story of how Arlo helped cLearn scale their continuous education programs
The problems these manual processes lead to for Jeff and other CE training providers are:
High administrative load - staff spend hours on repetitive tasks like manually confirming registrations, sending reminders, and issuing certificates leaving less time for program development or learner engagement.
Data silos and duplication - learner details, payments, and course records are scattered across spreadsheets, email threads,
Slow learner communication - Without automated confirmations, joining instructions, and reminders updates go out late or inconsistently. These issues can lead to lower course attendance, and more inbound customer queries to handle
Limited visibility for reporting - Pulling registration numbers revenue, or CEU totals meanus manually collating data from different places, making it harder to track KPIs or meet audit requirements.
Integration gaps - websites payment gateways, LMS platform, and CRMs don't share data. Staff spend time exporting and importing CSVs, which creates room for errors and delays.
All of these problems compound into higher costs, slower turnaround times, and a diminished learner experience.
Without a unified system, acting as a single source of truth, staff spend more time fixing errors and chasing information than delivering value, while decision-makers are left without reliable, real-time data to guide program growth or maintain compliance.

What kind of features help solve these issues?
To address these challenges, CE training providers should look for a platform that offers a set of capabilities purpose-built for complex registration needs, diverse delivery formats, and high-volume learner management.
Here's the features to look out for 👇
1. Registration set-up or all course formats and processes
CE providers need to be able to set up custom registration functionality that can be configured for every delivery format they run face-to-face, blended, live online, fully-self-paced and both public and private training.
For example, a public short course might allow instant online enrolment with payment at checkout, while a private session for a specific company could require restricted access, pre-approved participants, and invoicing arrangements agreed with the client.
Some continuing education programs may also have a multi-session format, where learners attend several sessions over days or weeks, and the registration process must capture availability for all dates in the series. And its often the case that a CE program may involve multiple courses, so bundled registrations should be an option, where learners or client organizations can enroll in several courses in a single transaction.
With a platform that can tailor the registration flow to each format and audience, staff don't have to retrofit a generic form for every course type, track approvals manually, or reconcile mismatched enrolments.
This means fewer registration errors faster onboarding of learners, and a clearer process for both the training provider ad the participant from the moment they sign up.

2. Payments and pricing management
CE providers need payment and pricing controls built directly into the registration process so every course can follow its own payment flow without manual intervention.
Staff should be able to set price tiers, apply member rates, set pre-requisites, and select payment methods specific to each course, whether that's card, bank transfer, invoice or purchase order.
Paid, free and mixed audience sessions all run through the same platform, so internal workshops, public courses, and private client programs are handled consistently from the outset.
For example:
- A public course course can take card payments instantly, and send receipts automatically
- An internal training session can be set t0 $0 so learners register without any payment steps
- If required member discounts can apply automatically, or for higher ticket programs, installment plans can be set up so you can split the total cost into set amounts with due dates, with learners getting reminders before each due date.

3. Learner self-service
A secure learner portal allows individuals and clients to manage their own training without relying on staff intervention. Learners can log in to see upcoming courses, access materials, download certificates, review payment history, and update their contact details.
If a learner needs to move a booking to a different date, they can transfer themselves to another available session to or cancel a booking. If you have a waitlist set up, the vacancy will fill as soon as its open, which helps reduce manual follow up, and helps course fill rates.
For corporate programs, client contacts can login to register multiple staff at once, track their progress, and download attendance or completion records, removing the need for back and forth emails.

4. Customizable forms and automated communication
Registration forms need to adapt to different learner groups, course formats, and compliance requirements while keeping manual for admins to a minimum.
Conditional fields should let you capture the right information for each audience, for example, asking for a professional license number only when the learner selects a regulated industry.
Once a registration is complete, automated workflows take over. Confirmations with calendar invites go out immediately, pre-course reminders are sent at set intervals, and post-course follow=ups trigger surveys, certificates, or next course recommendations.
If someone abandons their registration midway, the platform can send the registrant a prompt to complete it.

5. Multi-Site Administration, Certification, and Integrations
CE providers operating across multiple departments, campuses, or partner orgs need registration features that unify data management while respecting local control.
Role-based permissions allow administrators to limit access so that staff can only edit their own departments courses, while central oversight teams can view and produce detailed reports on all areas. Separate course catalogues keep public, corporate, and internal training listings distinct, avoiding confusion for learners while maintaining consistent branding.
Certification features cut down the time spent issuing and tracking credentials. Certificates can be generated automatically based on attendance or completion criteria, with CEU or credit-hour tracking recorded for each learner.
Integrations link registration data to other core systems. For example, survey tools can automatically collect learner feedback after course completions, and CRM connections keep learner records up to date without repeated exports.
Website integrations ensures current courses are displayed in real-time. API and Zapier access low further custom connections, so a provider can set up a custom integration with other tools in their tech stack.

Knowing which features will remove these bottlenecks is only the first step—choosing a platform that can deliver them reliably, at scale, and in line with your specific delivery formats is what turns this list into real operational improvements.
Ready to take your training to the next level?
Inside the Ultimate Guide to Training Management Systems, explore how world-class training businesses streamline operations, deliver exceptional learner experiences, and scale with confidence.
How to choose a platform that has these features
1. Clarify Your Delivery Formats and Audiences
CE training providers generally have a mixture of delivery formats, for example, public short courses, private training for specific clients, or more custom multi session courses.
If possible, try and make sure the registration platform can accommodate the way you deliver courses, so you're not forced into time consuming workarounds.
Here's a few points that you can follow to check during your vendor selection:
- Map your current course setup process for each format, from creation, pricing, and registration through to confirmation and reporting
- In vendor demos, walk through a real example for each format (e.g. a public course with instant card payment, a private client booking, and a multi-session program which captures attendance for all dates).
If you know the platform can handle each of your course formats natively, you'll know it can scale instead of holding you back.
2. Check for Flexible Registration and Payment Flows
Payment flows often differ by audience or course type.
For example, for a public course you might just require fields in a registration form that ask for a learners name, email and payment details.
A free internal training session might bypass payment entirely and simply capture participant details, and a corporate program could require a purchase order field and trigger an invoice on confirmation. You may also need the platform to support additional add ons, like waitlists, discount options, payment plans.
Tips for checking this include:
- Map out all payment scenarios you run now (and expect to run in future). Include public, private, internal, paid, free, and mixed-audience courses.
- In a demo, ask the vendor to set up a course for each scenario and walk you through the registration-to-payment process.
- Check that you can apply rules like member discounts, prerequisites, and payment method restrictions directly at course level.
- If you offer instalments, confirm you can set fixed amounts and due dates, and that reminder emails go out automatically.
- Ask how the system keeps finance records up to date—does it integrate with your accounting platform or will staff still reconcile manually?
3. Evaluate Learner Self-Service Capabilities
Learner and client self-service tools mean individuals and orgs can manage their registrations without relying on admin intervention.
Learners should be able to log into a secure portal to view upcoming and past courses, access materials, and certificates, manage their own transfers or cancellations, and review payment history.
Likely use cases for these features include:
- A learner who can no longer attend a session transfers themselves to a future date without contacting your team
- A corporate training manager logs into register multiple staff for a program, then later downloads a CSV of completion records for their HR system
- A past learner logs into reprint their certificate, without having to request it from your team.
We would recommend following the same process as mentioned as before, ask the vendor about self-serve capabilities, and have them walk you through what the process looks like on a demo.
4. Prioritise a platform that can be your single source of truth
Ideally, the platform should be able to act as the central database for all your continuing education operations. The one place where courses, schedules, registrations, learner profiles, payments, communications, certificates and reporting are stored and updated in real time.
Having all of these processes centralised within one platform ensures there’s no need to maintain parallel spreadsheets, reconcile mismatched lists, or copy-paste between systems.
All data, from the moment a learner registers to final certification, should flow automatically through the platform without duplication or manual syncing.
For example:
- Registration data populates learner profiles instantly, along with payment records and any prerequisite information collected on the form
- Scheduling data pulls directly from the same course template, so any update (e.g. a change of venue or session date) is reflected across the website, learner portal and internal calendar
- Financial data collected when a booking is made flows automatically to your accounting system of choice
- Communication data (confirmations, reminders, joining instructions) is triggered automatically from course rules, logged against the learners record, and stored for compliance tracking
- Completion data such as an accurate record of course attendance, assessment results, and the automatic issuance of certificates.
How to test in a demo
- Confirm that integrations update in real time and that no manual CSV uploads are required.
- Ask the vendor to walk you through a full learner journey: from registration on the website to payment, scheduling, reminders, attendance marking, certification, and reporting.
- Check that each step updates the same learner record and that any change, such as a session time shift, is visible everywhere instantly.
- Verify that reports are pulling live data, without needing exports from multiple sources.
A platform with all the features you need to run continuous education training programs
One category of platforms that have all of the features listed above are training management systems (TMS).
https://youtu.be/cXbwKH-iQB8
Training management systems like Arlo are built specifically for the needs of training providers, meaning they have a suite of features inside designed to streamline the entire training workflow from course creation, through to registration, certification and comms.
Specifically though, for registrations, a TMS gives you the ability to:
- Maintain a single source of truth
- Configure registrations for every delivery format
- Control payment flows and pricing rules
- Enable learner and client self-service
- Automate all course communications
To show you how these features work, here's a walkthrough of how you would set up a continuous education training program inside of Arlo 👇
Step 1: Setting up a course template
For CE training providers, the template is the foundation of every scheduled course. It stores all the default information you’ll reuse—saving you from re-entering details each time you run the same course.
What you set in the template:
- Core course information: Title, course code, accreditation or CPD points, and description written for your target learners.
- Format & structure: Choose whether the course is face-to-face, live online, blended, or eLearning. You can also define it as a single session, multi-session (with “attend all” or “choice of sessions”), or a recurring schedule.
- Default settings: Duration, pricing, tax rate, categories for website display, and any pre-loaded learning materials or attachments.
- Communication defaults: Automated emails for confirmation, reminders, follow-up, and certificate delivery.

Step 2: Configure the details of the course template
Once you’ve created a new template in Arlo, the next step is to define its key details so it’s ready for scheduling and registration.
This is where you set the defaults that will apply each time you create a course from this template.
1. General Information
- Name: Enter the official course title learners will see on the website and in communications.
- Price: Set the default cost (excluding or including tax as required). You can enter “0” for free courses or leave blank if pricing will vary per instance.
- Template Code: Either accept Arlo’s auto-generated code or set your own to match internal tracking or accreditation requirements.
- Template Manager & Course Provider: Assign an internal contact or external organisation responsible for the course content or delivery.

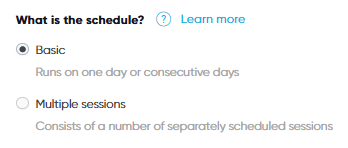
2. Schedule Type
- Basic: Use for single-day or consecutive-day courses.
- Multiple Sessions: Use when the course runs over separate, non-consecutive dates (e.g. a series of workshops).
3. Default Delivery Method
- At a Venue: Face-to-face training with a set location.
- Live Online (Webinar style): Virtual instructor-led sessions.
This setting pre-fills when creating courses from the template, but can be overridden per instance.

4. Logistics & Elearning Defaults
- Add standard room setup instructions, catering details, or linked elearning modules that will apply to all instances of the course.
5. Accounting Defaults
- Assign a default account code to ensure all revenue from this course is categorised correctly in your finance system.

Setting these details upfront means that when you schedule the course, the majority of fields will already be pre-populated—reducing admin and keeping your delivery consistent across regions and sessions.

Step 3: Add website page content and control visibility
This stage determines how your CE course appears online, what information is shown to prospective learners, and whether it’s public or private.

Website visibility settings
Choose whether the course page is published or unpublished. Keeping it unpublished is useful while you finalise details. For courses aimed at a specific client or closed audience, set the page to private so it’s hidden from the public catalogue. These private pages are only accessible via direct link or a private client portal.
Hosting options
Select whether the page is hosted using Arlo’s default setup or integrated into your own website via API or CMS integration.
Categorisation
Assign one or more categories so the course is grouped correctly in the catalogue. CE training providers often categorise by discipline (e.g., “CPD – Accounting”) or accreditation body.
Lead generation tools
Enable options for visitors to suggest another date/location or enquire about private delivery—particularly valuable for corporate CE clients wanting customised sessions.
Content fields
Enter an advertised duration, a short summary for listings, and a detailed course description. For CE providers, include learning outcomes, key topics, and continuing education credit values.
Additional detail fields
Add prerequisites and define the target audience. This helps learners quickly assess course suitability.
Images and branding
Upload a hero image for a professional, engaging course page.
Step 4: Configure registration settings and forms
Here you configure how people register for the course. You can enable or disable website registrations entirely, choose the default registration method (for example, a direct order process for instant sign-up or an approval-based method for restricted access), and decide how long registrations remain open—either right up until the course starts or closing earlier.
You can also set a custom “registration unavailable” message for when sign-up is closed, and link a specific registration policy to cover terms and conditions.

The registration form itself is fully customisable, you can add or remove fields, make certain questions mandatory, and reorder them as needed.
For example, a CE provider might add prerequisite checks like “Have you previously completed a Fire Warden training course?” so ineligible learners are filtered out before payment.
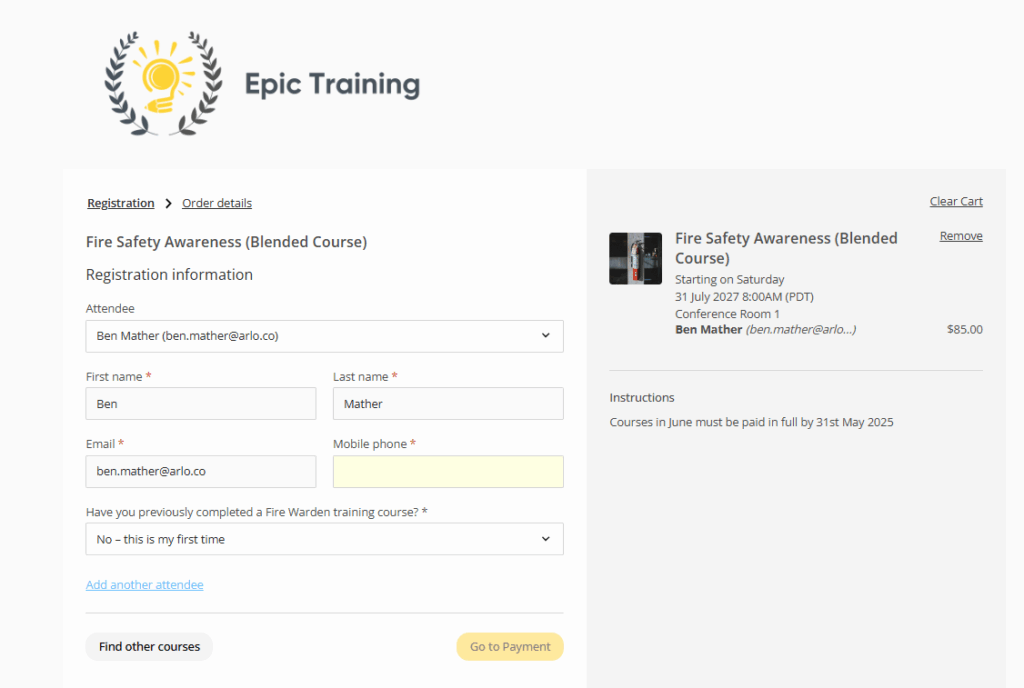
This flexibility means every course can capture the exact information it needs, whether for a public intake, a private corporate program, or an internal training cohort.
You can configure forms for both paid and free courses, with differences in workflow. Paid course forms trigger a complete payment and invoicing process—registrants receive a payment confirmation (or invoice) email immediately after submitting, followed by full course details.
Free course forms can be simplified into a single-page process, with registrants receiving a confirmation email containing all relevant details. Both can support multiple course registrations, multiple participants in one form, voucher codes, payment method selection, and waitlists.
Payment options are flexible, allowing credit card, invoice, or bank transfer, with integrations to payment gateways like Stripe, PayPal, and Windcave, plus accounting platforms such as Xero and QuickBooks.
Transfers, refunds, and cancellations can be managed directly in Arlo, with automatic notifications sent to participants and self-service tools enabling them to make changes themselves.
If your Arlo platform is integrated with your website, registrants can also log into a branded customer portal, hosted as part of your site, to register for further courses, view upcoming and past training, update their profile, and manage their bookings in one place.
Step 5: Setting up course communications
Once your course details and registration options are configured, you can define how Arlo manages communication with both registrants and presenters.

Here, you can activate and customise a full communication schedule:
- Registration confirmations – Automatically send a confirmation email to participants as soon as they register. For paid courses, this can include invoice or payment confirmation details; for free courses, it simply provides joining instructions.
- Presenter confirmations – Notify presenters when they are assigned to a course, including essential delivery details such as venue, schedule, and participant information.
- Reminders and follow-ups – Schedule automated reminders for registrants (e.g. one week or one day before) and presenters, reducing manual admin while improving attendance rates.
- Reports to presenters – Automatically send a participant list and attendance register to presenters ahead of the course date.
- Certificates – If your CE program awards certificates, you can set these to be automatically generated and emailed to attendees upon course completion.
Step 6: Review and manage the live course listing
Once your course template has been created and published, you can view it as a live course record.

From here, you can confirm key details such as the course title, code, price, and whether it’s visible on your website. This view also gives you quick access to schedule additional sessions using the same template, edit the listing, tag the course for internal tracking, or access key reports and documents.
For continuing education providers, this stage is where you ensure the listing is ready for participants to find and register.
You can check that the course appears in the right category on your site, verify pricing (including tax settings), and confirm that all website content and registration settings from earlier steps are working as intended.
From this screen, you can also track and manage any leads that come in, allowing you to follow up on interest from individuals or organisations before they register.
This helps you maintain a steady pipeline of enrolments and respond quickly to potential clients.
Step 7: Course published and visible on your site
Once your course is created and published in Arlo, it appears instantly on your website in the catalog view. Visitors can browse by category, filter by location, and use tags to find exactly what they’re looking for, whether that’s a specific CE training topic, delivery format, or venue.

Public courses display all key details up front, such as dates, prices, and presenter names, along with registration buttons like Register Interest or View upcoming dates.
For paid courses, these buttons take visitors to the full registration form with payment processing options. For free courses, visitors are directed to a simple confirmation form.
Private or invitation-only courses don’t appear in public listings. Instead, you can share a direct link with approved participants, giving them access to the same registration process without exposing the course to general visitors.
This flexibility allows CE providers to run open enrolments alongside exclusive, client-specific programs—all from the same platform.
Step 8: Course view (learner perspective)
Once your continuing education (CE) course is live, prospective learners can browse and filter offerings on your website by location, category, or other tags.

Each listing displays key details upfront—title, delivery format (e.g., blended, in-person), duration, price, and presenter—helping learners quickly assess relevance.

When a learner selects a course, they land on a dedicated course page containing:
- Compelling overview and learning outcomes: Explains the course purpose, relevance to their profession, and what they’ll achieve by attending.
- Detailed syllabus: For example, a “Workplace First Aid” CE course might outline modules on hazard recognition, incident assessment, managing specific medical situations, and completing a certification quiz.
- Audience suitability: Clearly identifies who should attend, from beginners to experienced professionals seeking recertification.
- Session details: Lists available dates, times, delivery methods (e.g., live online, at a venue), and time zones.
From here, learners can register directly through the booking button. This connects them to the registration form set up earlier - handling payment if required, capturing any prerequisite information, and sending the right automated communications (confirmation, reminders, presenter notifications, etc.).
This final step is where all your setup work comes together: clear presentation, targeted messaging, and a frictionless booking process help convert interest into registrations while ensuring participants get exactly the right information before attending.
Final thoughts
For continuing education providers, registration is the first and most critical step in delivering a positive learner experience.
The right registration system will help you eliminate the patchwork of manual processes, spreadsheets, and disconnected tools that slow teams down and introduce errors.
A purpose-built training management system (TMS) brings all registration-related functions into one place, handling multiple course formats, payment flows, conditional data capture, automated communications, corporate account management, certification, and integrations with your other systems.
Ensuring registrations are processed quickly, accurately, and with minimal staff intervention. That means fewer errors, faster reporting, better compliance, and more time to grow your programs instead of managing them.
If you’d like to try the #1 TMS that CE training providers are using to scale their training programs, you can get started with Arlo today 👇
Try Arlo for free. Get started with a 14-day trial.
FAQs
What is continuing education registration software and why is it important? Continuing education registration software is purpose-built to help providers manage course enrollments, payments, and records in one place.
The difference between more standard registration solutions, and registration software suited for continuing education providers is specific features, such as:
Multi-session and bundled registration options for programs that run over weeks or combine several courses.
Flexible payment flows including member discounts, invoicing, installment plans, and purchase orders. And multiple payment options
Learner and client self-service portals so individuals can manage their bookings and organisations can register staff in bulk and track progress.
Automated CEU and certification tracking to ensure learners receive credit hours and valid certificates without manual processing.
Customisable forms and conditional fields that capture professional license numbers, prerequisites, or compliance data.
Multi-site administration and reporting that provide visibility across departments, campuses, or corporate clients while maintaining local control.
All of these features reducing administrative overhead and manual administrative tasks, saving staff time and makes it super easy to run courses and multiple programs for more students.
Can the software handle different registration and payment processes? Yes. CE providers often run courses for different audiences—employees, businesses, or the wider community.
Learners can register for own courses, classes, seminars, or multiple programs in a single transaction. Flexible payment options (credit card, invoice, or installment plans) make the process super easy for both learners and administrators.
CE providers may also want to customise the registration process for private or public training. Public training typically requires open online enrolment with instant payment at checkout and automated confirmation emails.
Private training, by contrast, may require restricted access so only approved learners can register. In these cases, the software allows administrators to set up invitation-only registration pages, enforce prerequisite checks, and configure invoicing or purchase order arrangements directly with the client organisation.
What kind of insights and reporting can CE providers benefit from with continuing education registration software?
Continuing education registration software consolidates all registration and course data. For example, admins can pull course registration and enrollment rates, attendance rates and more learner facing metrics.
From the revenue side registration rates can be tracked in conjuction with revenue per course, overall revenue, revenue per organisation and much more. All turned into data driven, actionable insights that can be used to monitor performance.
For example, enrollment rates can help gauge program demand, and help continuing education institutions make informed decision about where to invest staff time and which services to potentially expand, and where to make changes,
Providers can generate reports that deliver actionable insights into enrollment rates, program demand, learner performance, and retention rates. This helps businesses and institutions make informed decisions about where to invest staff time and which services to expand.
Who benefits most from using this type of software?
Any type of business that provides provider of continuing education. At Arlo the continuing education providers we work with span multiple sectors, including:
Commercial training providers - providing continuing education programs to multiple different sectors including, construction, manufacturing, finance, leadership training and much more.
Universities – offering professional development and continuing education programs to alumni, local professionals, and the wider community, often across multiple campuses and faculties.
Professional associations – running mandatory continuing professional development (CPD) programs to help members maintain licenses or meet regulatory requirements.
Higher education institutions and schools – managing extension programs, adult education, or short courses designed to build specific skills for employees and community learners.
Corporates and employers – providing internal continuing education and training opportunities to employees as part of professional development and retention strategies.


.png)
.png)